Table of Contents
Office Accelerator User GuideCalendarMain Menu (Calendar)Edit Menu (Calendar)New TaskNew Appointment (Calendar)New All Day Event (Calendar)Set Color for Day (Calendar)New Day Color (Calendar)New Category (Calendar)Repeat (Copy) Appointment (Calendar)Repeat (Copy) Task (Calendar)Search for Calendar Items (Calendar)Terms and Conditions
New Appointment (Calendar)
To create a New Appointment in the Office Accelerator calendar, follow the directions below.
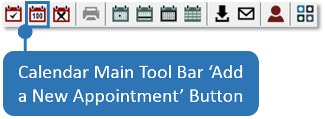
Open the Office Accelerator Calendar and select |Edit|New Appointment|, or you can use the |Add a New Appointment| button on the Calendar Main Tool Bar. Fill out the New Appointment form then click the |Save| button.
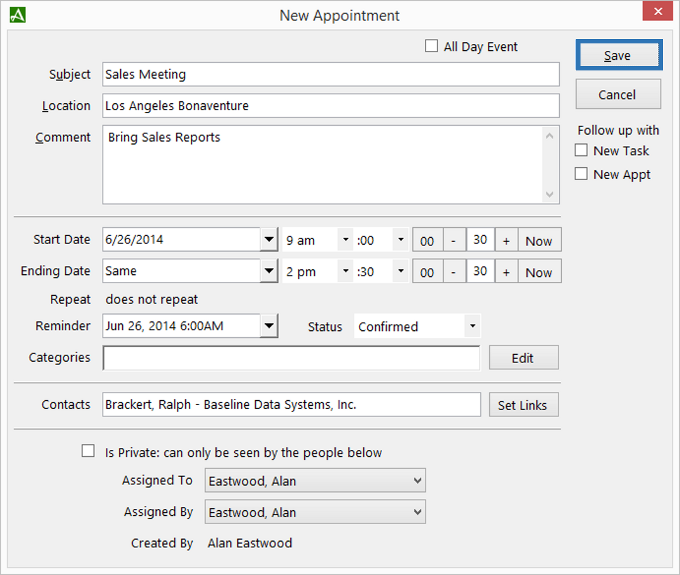
| All Day Event (Check Box) | Checking this option will convert the appointment into an All-Day Event |
| Subject | Enter the Subject for the Appointment into this field. |
| Location | Enter the location of the appointment into this field. |
| Comment | Enter Appointment comments into this field. Comments can be optionally hidden or displayed within the Appointment section of the calendar. |
| Save | Clicking this button will save your Appointment to the Appointment section of the calendar. |
| Cancel | Clicking this button will Cancel the New Appointment operation and discard any information you entered. |
| Follow up with (New Task) | Checking this box will open the |New Task| screen for the purpose of creating another task after saving the appointment. |
| Follow up with (New Appt) | Checking this box will open the |New Task| screen for the purpose of creating a new Appointment after saving the current appointment. |
| Start Date | Used to set a start date and time for the new appointment. |
| Ending Date | Used to set an ending date and time for the new appointment. |
| Repeat | Indicates whether the appointment is a repeating event. |
| Reminder | Used to set New Appointment reminder. Reminder will spawn at scheduled time, calendar must be opened to receive reminders. |
| Categories | Use the categories option to add the appointment to an existing category. |
| Status | Provides the following appointment status options: No Status, Done, Rescheduled, Canceled, Confirmed, Unconfirmed, No Show.
Note: when the status is Canceled or Rescheduled, the appointment timeslot is not marked 'busy'. All other status causes the timeslot to be marked 'busy'. |
| Contacts | Used to link the Appointment to an Accelerator contact(s). Click the |Set Links| button to search for and link contacts. |
| Is Private | If checked, appointment is only visible to the user the appointment is assigned to, and the user that assigned the appointment. |
| Created By | Indicates who created the appointment. |
Contacts linked to appointments can view the appointment within the
Action tab of the phone book.
New Appointments will be displayed within the calendar 'Appointments' section of the Accelerator Calendar. You can edit your appointment by left clicking the appointment. You can use the |New Appointment| link to create a New Appointment or select additional options available by right clicking the appointment.
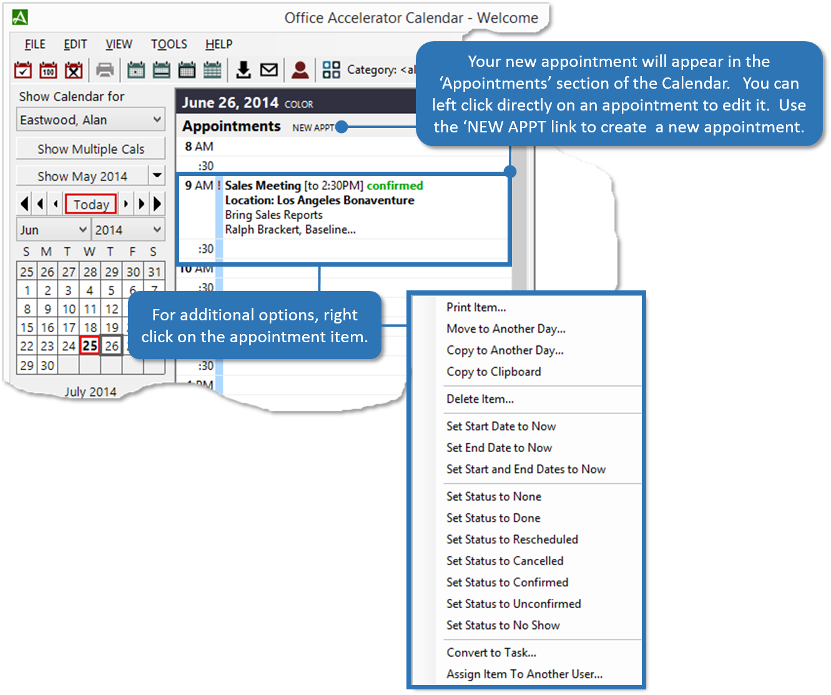
| Print Item |
| Move to Another Day |
| Copy to Another Day |
| Copy to Clipboard |
| Delete Item |
| Set Start Date to Now |
| Set End Date to Now |
| Set Start and End Dates to Now |
| Set Status to None |
| Set Status to Done |
| Set Status to Rescheduled |
| Set Status to Canceled |
| Set Status to Confirmed |
| Set Status to Unconfirmed |
| Set Status to No Show |
| Convert to Task |
| Assign item to Another User |
© 1991-2024 - Baseline Data Systems, Inc.