Create Edit Letter Format
Office Accelerator includes a powerful add-in called the Accelerator Macro Suite (AMS). To create a customized merge letter in Office Accelerator using AMS, follow the directions below.
Creating Your New Merge Document
-
Open the Office Accelerator phone book and click the |Tools| menu, then select |Word Processor| to open Microsoft Word.
If word doesn't open via |Tools|Word Processor|, see Word Processor Path. From your Word document, click the |ADD-INS| tab and click |Accelerator|Create or Edit|Letter Format|.
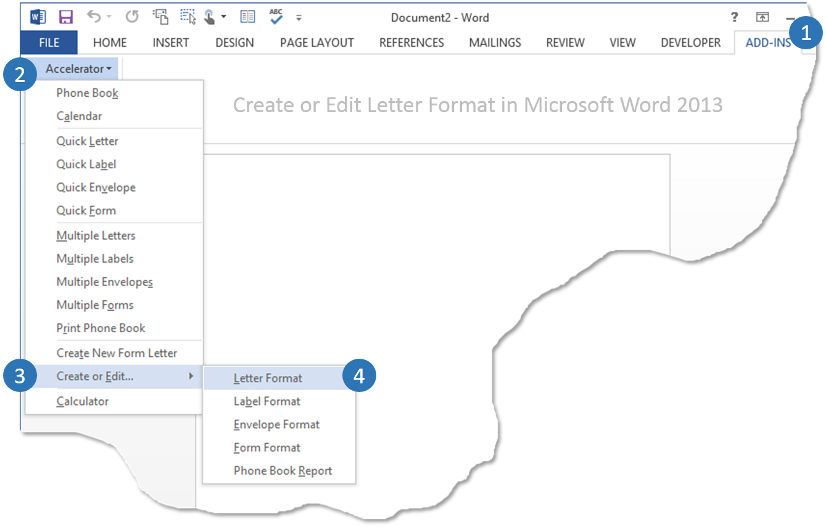 If you don't have an Accelerator menu, see Adding the Accelerator menu to Word.
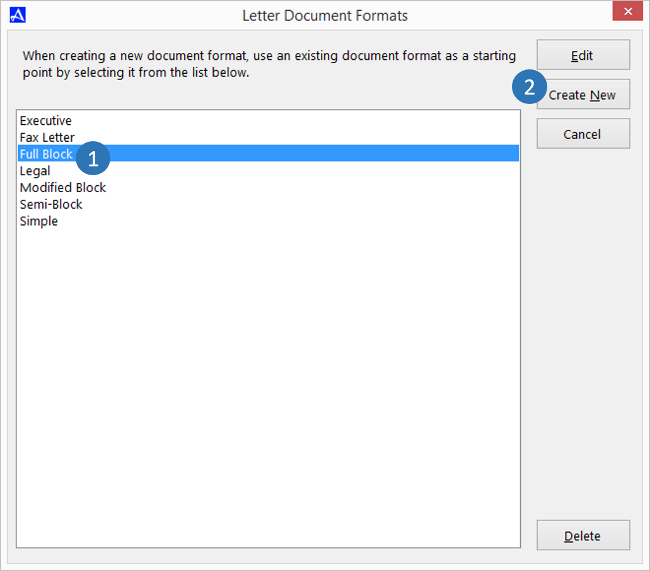
The |Letter Document Format| dialog box provides the pre-defined letter merge documents that ship with Office Accelerator. When you design a custom letter template, you will start by selecting one of these pre-defined formats. In this example we'll use the Full Block Letter type, select the |Full Block| letter type then click the |Create New| button.
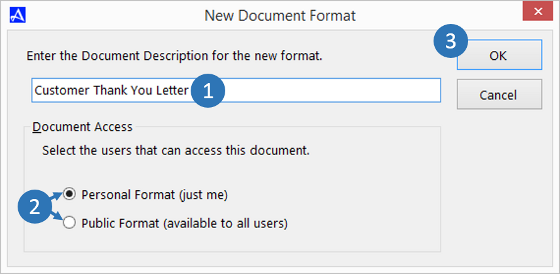
You will need to provide a unique name for your new custom letter document, in this example we'll call it 'Customer Thank You Letter'. By default your new document will be created for use by just you (Personal Format), however if you would like to share the document with other Accelerator users, select the |Public Format|. Click the |OK| button to save your selections.
 Public format documents are stored in the location determined by your user defined public documents path. This path should point to the same location for each Office Accelerator user within your account e.g. \\shared\oadocs\ etc.
Public Documents are available to those users with appropriate user rights.Click |OK| to the message reminding you to save your changes.
Office Accelerator will now display your merge letter document in Word. In this example, we'll create a 'Customer Thank You Letter' document and use it to create thank you letters for a group of contacts in Accelerator.
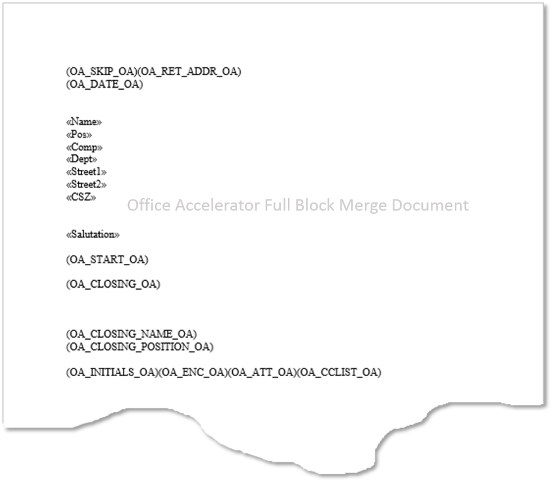
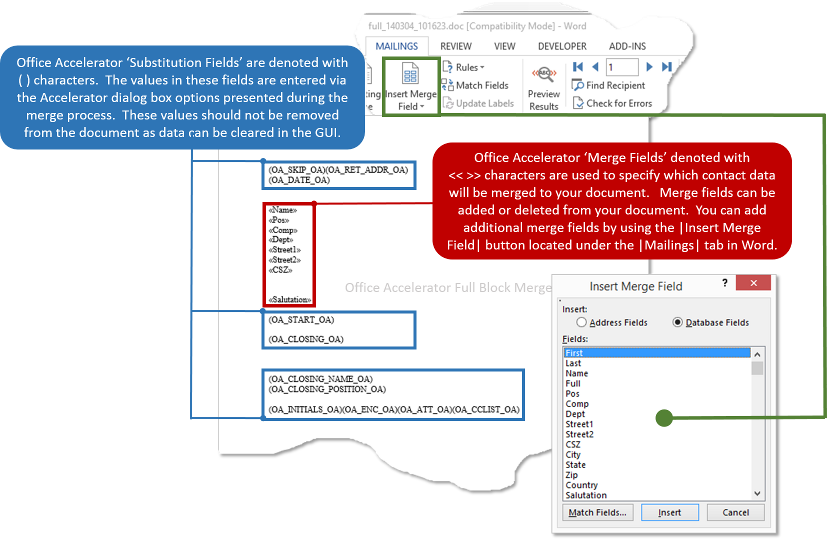
The Accelerator Full Block merge document is just like any Word document in that you can add and delete text and images as well as modify the formatting and layout of the document. What makes this document unique is that it contains substitution and merge fields which are used to insert information from Office Accelerator into your document. You decide what and where in your document information from Accelerator will be merged by placing merge fields in the desired location and adding values to the substitution fields.
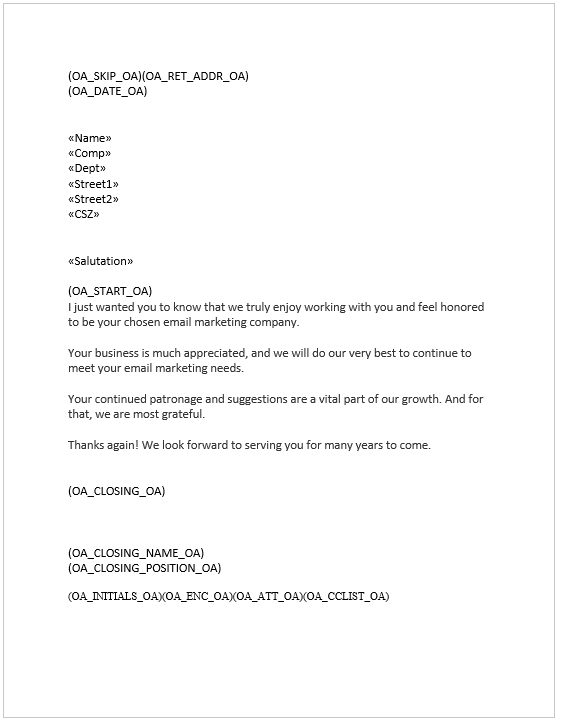
In the example below, we have removed some of the merge fields and added text to the body of the letter. Once you have completed modifying 'your' document, be sure and click the |Save| button, then close the merge document.
 Because the merge document contains special attributes that work with Accelerator, be sure NOT to change the name or location of your document. Simply press the |Save| button in Word to save your changes.
The following tables describes the substitution and merge field values respectively.
OAM Substitution Fields Substitution Field Definition (OA_SKIP_OA) Used for Pre-printed letterhead, allowing space for printing to start below pre-printed letterhead. (OA_RET_ADDR_OA) Inserts selected return address. (OA_DATE_OA) Inserts date and selected format. (OA_START_OA) Inserts the cursor at this location. (OA_CLOSING_OA) Inserts the selected closing value. (OA_CLOSING_NAME_OA) Inserts the selected closing value e.g. Sincerely etc. (OA_CLOSING_POSITION_OA) Inserts the selected closing position. (OA_INITIALS_OA) Inserts the selected closing initials. (OA_ENC_OA) Inserts the enclosure value. (OA_ATT_OA) Inserts the enclosure value. (OA_CCLIST_OA) Inserts the CC values. OAM Available Merge Fields Available Merge Fields Definition EID Merges Unique identifier contact value First Merges first name field value Last Merges last name field value Name Merges 'Addressee' GUI value Full Merges Title, First, Middle, Last, Post Pos Merges position field value Comp Merges company field value Dept Merges department field value Street1 Merges street 1 field value Street2 Merges street 2 field value CSZ Merges City, State and Zip field values City Merges City field value State Merges State field value Zip Merges Zip field value Country Merges Country field value Salutation Merges Salutation value selected during merge operation (not stored contact record) PhoneF Merges the Fax number value PhoneB Merges the Business number value Barcode Merges the barcode font (this bulk mail method is deprecated) Search 1 Legacy Field (no longer used but reserved) Search 2 Legacy Field (no longer used but reserved) Search 3 Legacy Field (no longer used but reserved) Custom# Merges Custom Fields 1 - 160 (160 = max allowable custom field merge value) Using Your New Merge Document
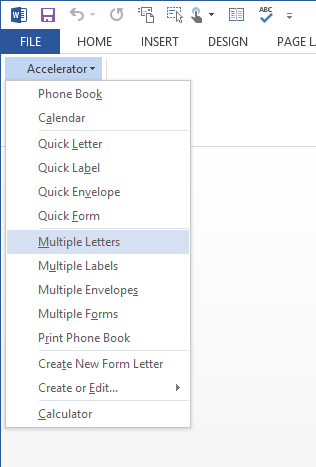
To use the merge document you created above, open Microsoft Word and click |Accelerator|Multiple Letters| located under the |Add-Ins| tab.
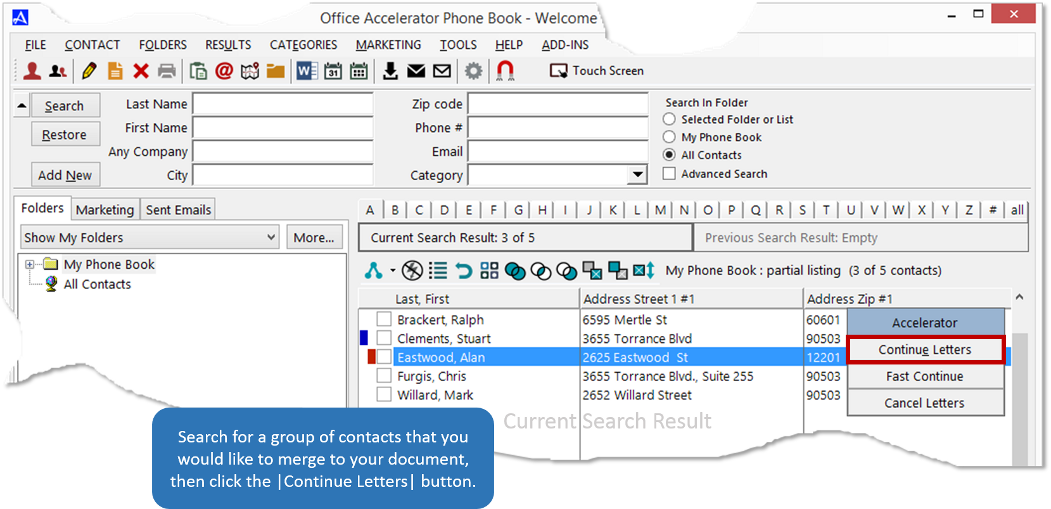
The Accelerator menu will return you to the Accelerator phone book where can search for the contacts you would like to send 'Customer Thank You Letters'. Click the |Continue| letters button to proceed, all contacts in the current search result will be merged to your 'Thank You Letter' document.
There are 8 sections in the |Multiple Letters Options| screen. The |Multiple Letter Options| screen corresponds to the substitution and merge fields in your 'Customer Thank You Letter' merge document. In Section - 1 entitled |Letter Format| we need to select |Customer Thank You Letter| as this is the merge document we created above. For our purposes we'll also use Section - 3 (Return Address), Section - 4 (Headings), Section - 5 (Closings), and Section - 8 (Document Tracking Log).
Click the |Continue| button to proceed to the next step.
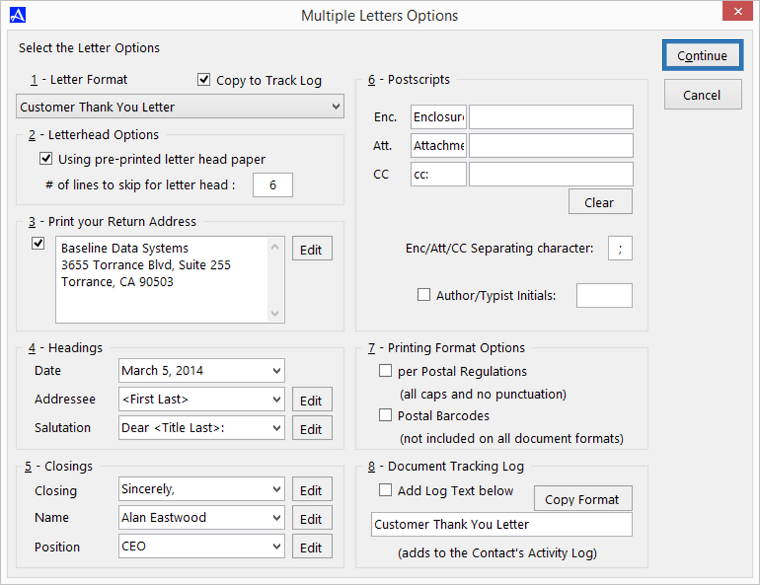 Notice that the |Copy to Track Log| option has been checked. This option copies the letter format description to Section - 8. During the merge process, a log event (containing the text in Section - 8) will be created for each contact that is merged, this way you'll know which customers received your 'Customer Thank You Letter' and which did not.Each section of the Multiple Letter Options dialog box and its corresponding substitution and merge fields are described in the table below.
By default, your 'Customer Thank You Letter' will be sent to your word processor. Typically, you'll want to use the |Display in Word Processor| option so you can view your document in the event you need to make changes. You can also print the document directly to your default printer, select an alternate printer, or send the document as an email merge to Outlook. Accelerator will merge all of the contacts that are in the current search result, however, you can select the range option and designate a specific range of contacts to merge from the current search result. Make sure the |Display in Word Processor| option is selected and click the |Continue| button.

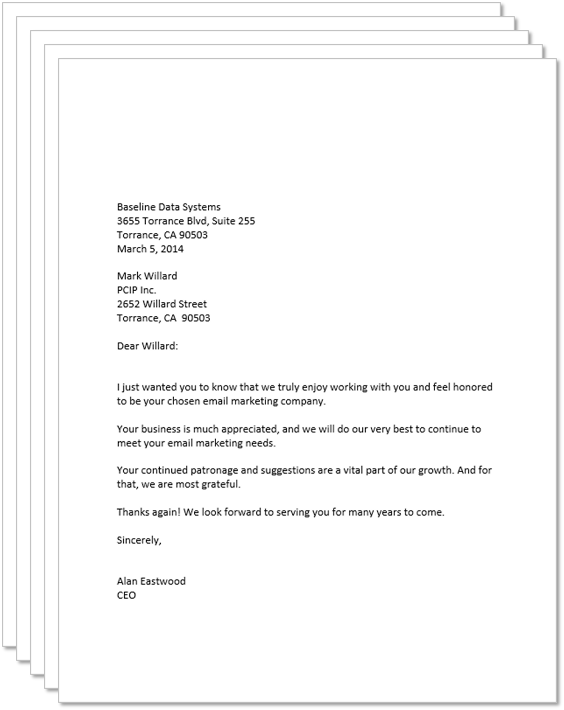
When the merge in complete, your 'Customer Thank You Letter' documents will be created in Word. Each contact in the current search result will be merged to a 'Customer Thank You Letter' where it can then be printed.
Full Bock Merge & Substitution Field Values to Multiple Letter Options Mappings
Full Block Substitution Fields Substitution Fields Corresponding Multiple Letter Options (Graphical User Interface) (OA_SKIP_OA) Section - 2 - Letterhead Options: Used for pre-printed letter head paper, sets number of lines to skip for letter head. If checked, creates space indicated by supplied numeric value. (OA_RET_ADDR_OA) Section - 3 - Print your Return Address: If checked, substitutes supplied value. (OA_DATE_OA) Section - 4 - Headings: Will use value within the 'Date' field. (OA_START_OA) This this field is used to place the cursor, upon merge the cursor will start at this field location.. (OA_CLOSING_OA) Section - 5 - Closings: Will use value within ,Closing' field. (OA_CLOSING_NAME_OA) Section - 5 - Closings: Will use value within 'Name' field. (OA_CLOSING_POSITION_OA) Section - 5 - Closings: Will use value with the 'Position' field. (OA_INITIALS_OA) Section - 6 - Postscripts: If |Author/Typist initials| is check, will use value within provided field. (OA_ENC_OA) Section - 6 - Postscripts: Will use value within the 'Enclosure (Enc.)' field. Used to indicate number of enclosures. (OA_ATT_OA) Section - 6 - Postscripts: Will use value within the 'Attachments (Att.) field. Used indicate number of attachments. (OA_CCLIST_OA) Section - 6 - Postscripts: Will use value within 'CC (cc:)' field. Used to store the initials or full name of additional recipients of your merge document. Full Block Merge Fields Merge Fields Corresponding Multiple Letter Options (Graphical User Interface) <<Name>> Section - 4 - Headings: Will merge name format as indicated within the 'Addressee' field. Use the |Edit| button to change default value as well as select alternate name (or company) format. <<Pos>> Section - 5 - Closings: Uses value within the 'Position' field. Use the |Edit| button to enter additional values. <<Comp>> Section - 5 - Closings: Uses value in 'Closing Field'. Use the |Edit| button to enter additional values. <<Dept>> Merges the 'Dept' field value within a contacts(s). <<Street1>> Merges the 'Street' field value within a contact(s). First Street field in phone book = street 1 <Street2>> Merges the 'Street' field value within a contact(s). Second Street field in phone book = street 2 <<CSZ>> Merges City, State, and Zip field values within contact(s). <<Salutation>> Section - 4 - Headings: Will use value within 'Salutation' field. Use the |Edit| button to use different values. Letter Formats that Ship with Accelerator
Full Block Letter Formats Letter Name Executive Fax Letter Full Block Legal Modified Block Semi-Block Simple © 1991-2024 - Baseline Data Systems, Inc.