Pipeline Manager
The Pipeline Manager feature is used to create a running to-do list for your contacts for the purpose of achieving a particular goal such as closing a sale. When you create a pipeline for a contact, the contact is added to your Pipeline Manager where each activity that takes place for the contact is logged such as when calling a customer, sending email or scheduling a future activity. Scheduled and/or future activities are marked as pending until which time they are completed, once a goal for a pipeline has been met (or hasn't been met), the pipeline for the contact is closed and marked with the appropriate status. Closed pipeline items are removed from the Pipline Manager.
Creating a New Pipeline from a Lead Alert
The following scenario describes the process of creating a 'Pipeline' from a 'Lead Alert' and managing the pipeline within the 'Funnel Manager' until close of sale.
-
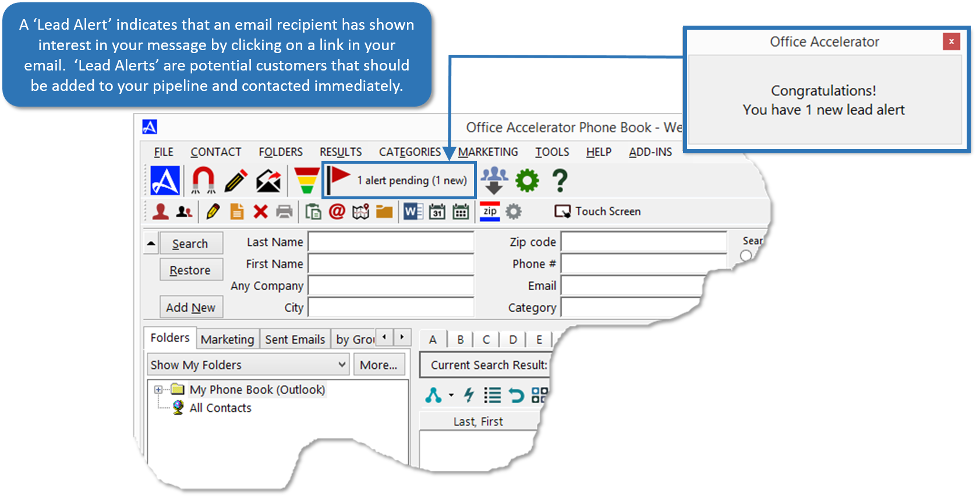
After having sent an email campaign to your customers advertising a limited time 25% discount on your Solar Panels, you begin receiving 'Lead Alerts' indicating that your email recipients have begun showing an interest in your email message.
-
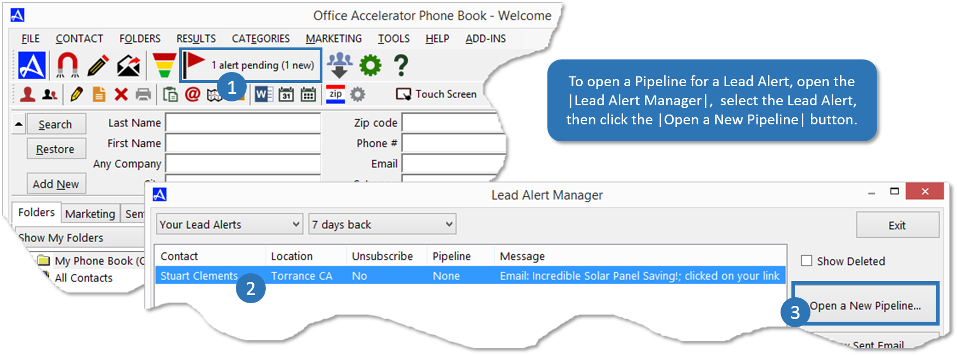
Since Lead Alerts are potential customers, a Pipeline should be created for the conctact. To add the contact to your Pipeline, click the |Lead Alert Manager| icon, highlight the 'Lead Alert', then click the |Open a New Pipeline| button.
 Pipelines can be closed for other reasons as well, such as when a goal cannot be reached due to a customer not be interested in your product or service.
 -
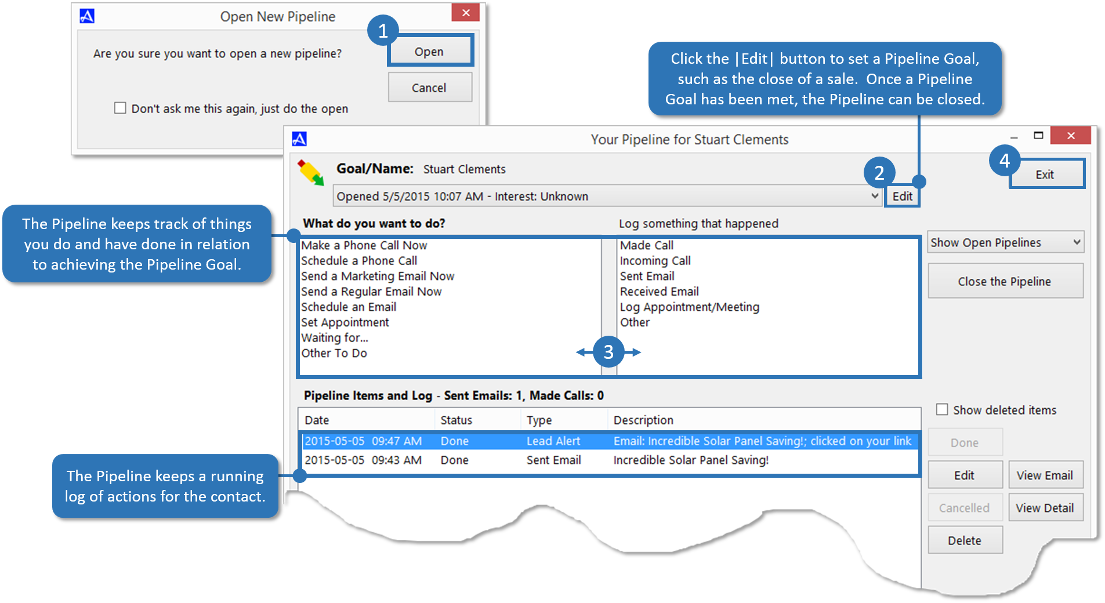
When prompted, click the |Open| button. A Pipeline is used to manage, track and schedule actions for a contact. These actions are typically for the purpose of achieving a goal such as closing a sale, you can set a goal for the Pipeline by clicking the |Edit| button. You can log actions in the Pipeline by selecting something that you would like to do immediately under the section entitled 'What do you want to do'. To log an action that has already occurred, select an item from the section entitled 'Log Something that happened'. You can view all the actions that have taken place for the contact within the 'Pipeline Items and Log' section. Since the purpose of the Pipeline is to create actions toward the achievement of your goal (in this case closing a sale), a pending action should be scheduled from the 'What do you want to do' section prior to exiting the pipeline, a Pipeline should always have a pending action (something to do next toward the achievement of your goal). Once the goal has been reached, a pipeline can be closed.
-
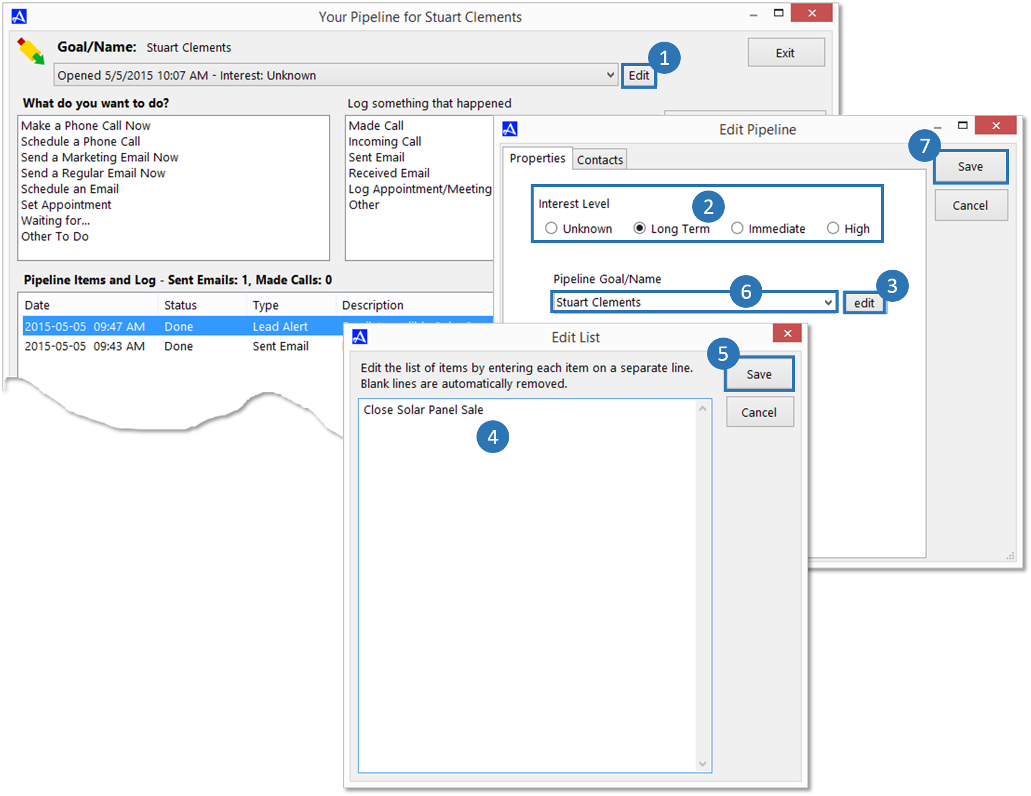
In the below example, a goal is entered for the Pipeline. To set a goal, click the |Edit| button and select an |Interest Level| from within the |Properties| tab. From within the |Properties| tab, click the |Edit| button and enter a Pipeline Goal name, in this case 'Close Solar Panel Sale', click the |Save| button from within the |Edit List| screen to save your entry. From the |Pipeline Goal/Name| section click the drop down list and select the newly entered goal, then click the |Save| button within the |Edit Pipeline| screen.
-
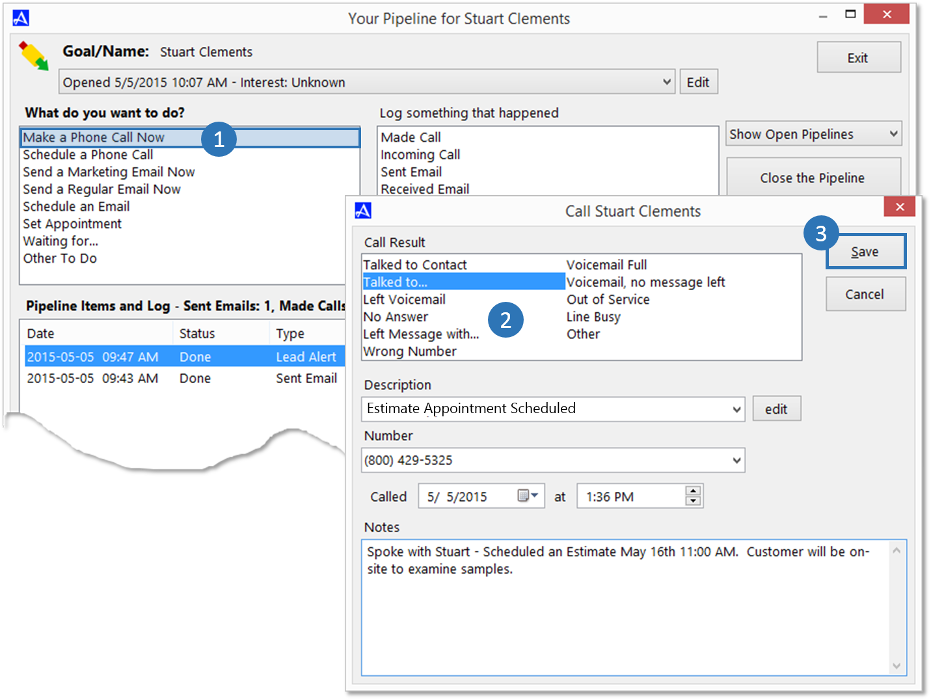
Next, a phone call will placed to the customer. To place a call to the customer, click the |Make a Phone Call Now| option under the 'What do you want to do' section. Place your call using the number listed, then enter the details of the conversation, for example, you scheduled an onsite estimate with the customer. Click the |Save| button to save your entry.
-
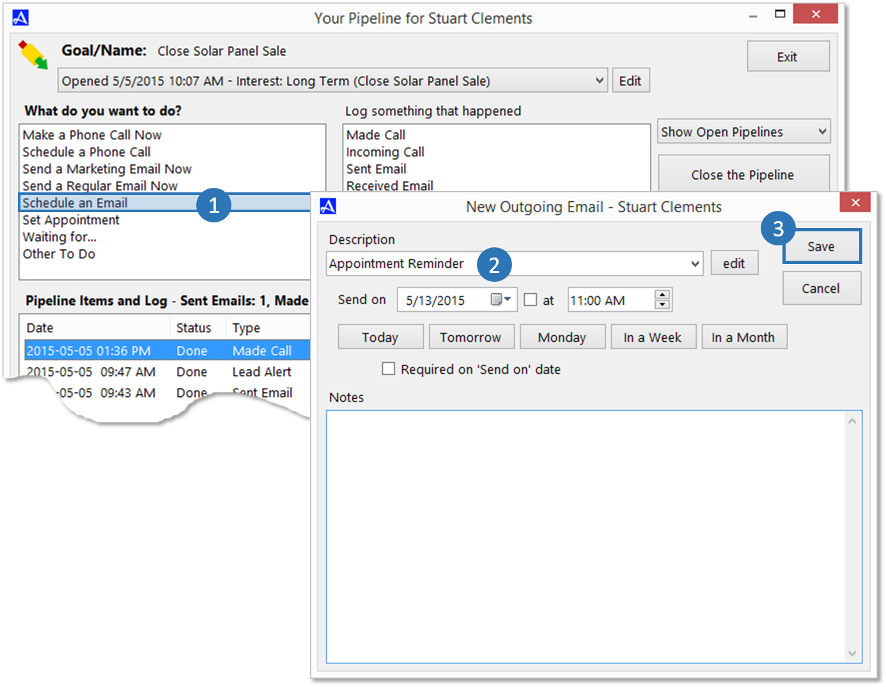
Before exiting the Pipeline, you'll want to select the next thing to do with the contact. In this case, an appointment reminder email will be added as a future pending item. From the 'What do you want to do' section, click the |Schedule an Email| option, enter the description for the action then click the |Save| button.
-
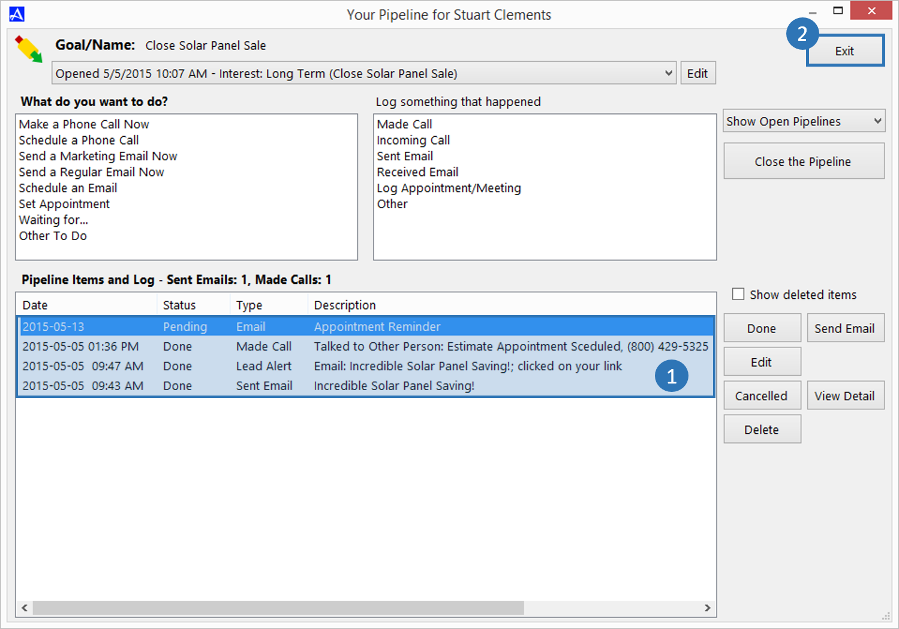
Reviewing the |Pipeline Items and Log| section, notice that all of the actions that have taken place for this contact are listed in this section. An email campaign has been sent to the customer, a 'Lead Alert' has been received, a call to the customer has been placed and an onsite appointment has been scheduled for an estimate, and a 'Pending' email reminder has been entered to be sent out at a later date. Notice the status on each item, all are denoted as 'Done' whereas the 'Apointment Reminder' has been scheduled to be sent out at a later date and is thus marked 'Pending'. Pending items will be displayed within your 'Funnel Manager' and are always the 'Next Action' that will be taken for the customer and toward the achievement of your goal. Click the |Exit| button to close the Pipeline for this contact.
-
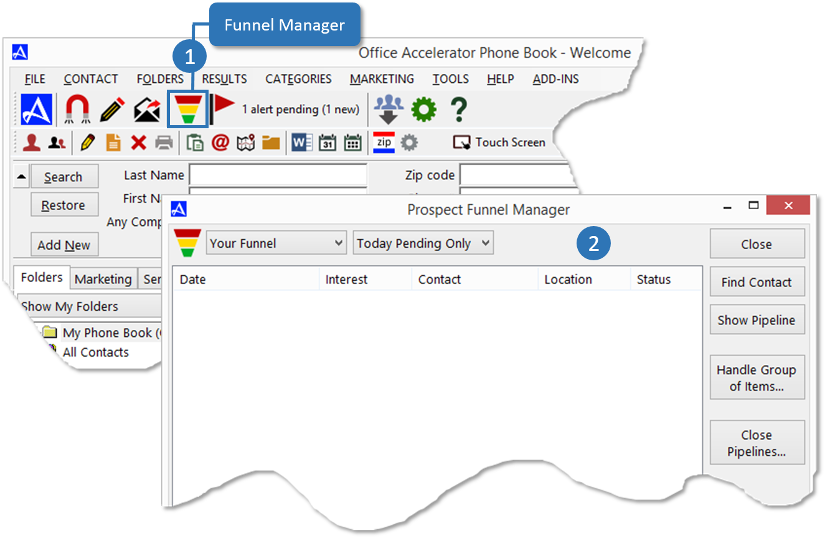
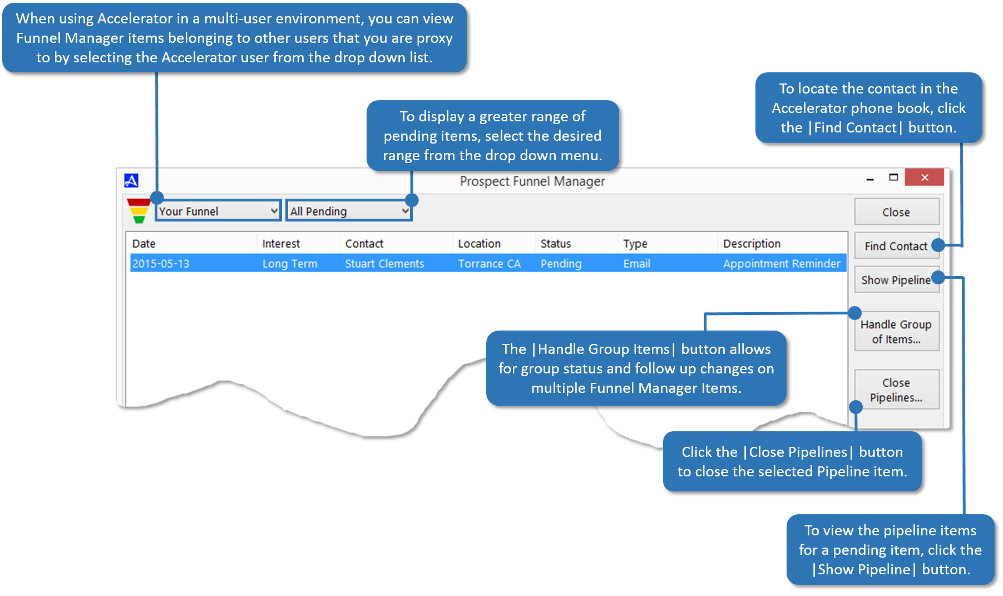
The Funnel Manager is used to display all 'Pending' Pipeline actions and can be opened via the |Marketing| menu by selecting |Funnel Manager & Pipelines| or by clicking the |Funnel Manager| icon on the |Email Marketing| Tool bar. The Funnel Manager is also displayed after creating and exiting a new Pipeline item. The Funnel Manager is your everyday to-do list for pending Pipeline items, these pending items should support your efforts to achieve your Pipeline goal.
-
By default, the |Funnel Manager| will display 'Your' pending Funnel items for today. To view additional pending items, select the desired date range from the drop down. To locate the contact within the phone book, select the Pipeline item and click the |Find Contact| button. To view the Pipeline details, select the Pipeline item and click the |Show Pipeline| button. To change status and follow up information on multiple Pipeline items simultaneously, click the |Handle Group of Items| button. To view Funnel Manager data from other users that you are proxy to, click the drop down and select the proxy user. To close a Pipeline, click the |Close Pipelines| button.
 If there are no items in the Funnel Manger view, there are no pending items for the day.